Customization of Report Cards, Progress Reports, and Rubrics
This manual will show users how to customize report cards / progress reports to meet the needs of various school models. Within this area users can create Classic Reports Cards, Rubric Style Report Cards, Progress Reports, and combined Classic/Rubric report cards.
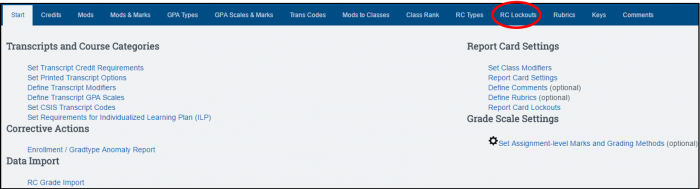
To begin the customization process go to Admin > Transcripts > Transcript/Report Cards. Working in this area requires permissions to be set for user.
The area you will be working in is “Report Card Settings” which you can access through the links or tabs.
A. ARE THE “SCHOOL TYPES” SET-UP FOR YOUR SCHOOL?
It is important to make sure that there are “School Types” set-up in your school as this area affects graduation requirements, grade weights, course modifiers, and how grades are posted in report cards. Make sure School Type(s) are set-up as the templates will be attached to School type once it is created.
To verify that School Types are set up for your school:
- Click on “Set Transcript Credit Requirements”
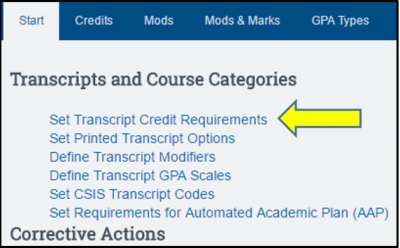
- View the various School Types set within your school
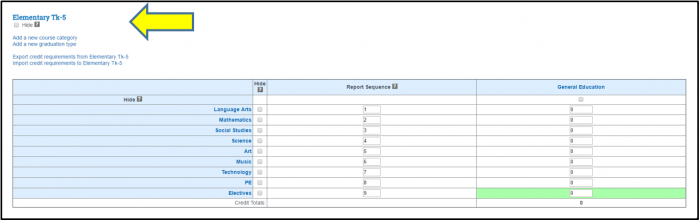
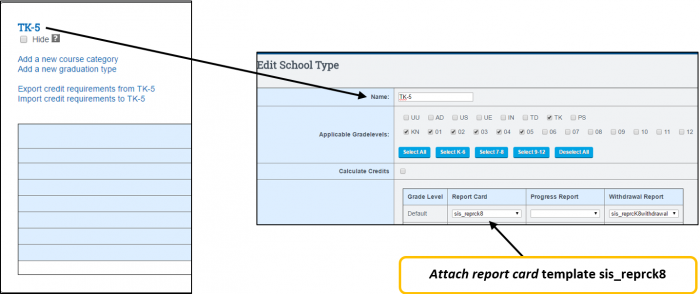
- Click on the name of the School Type (Example: “Elementary TK-8”)
- If needed, you have the ability to create separate and distinct templates for:
- Report Card
- Progress Report (based on a “Progress Report Sub Period”)
- Withdrawal Progress Report (based on a “Progress Report Sub Period”)
This allows you to have different information on each report.
- Choose ONE of the following:
Option 1: Once you create templates, attach under the Default location using the appropriate drop down box and click SAVE. Templates already in use will be populated in the Default location.
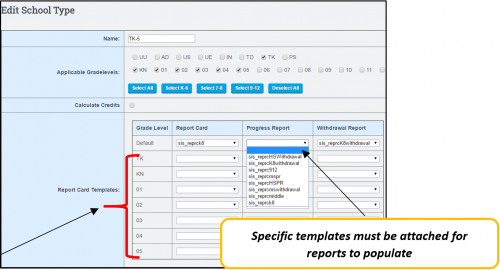
Option 2: *NEW* Ability to create a TEMPLATE per grade level for a single school Type – For example, students enrolled in the TK-8 Grad Type, you can create a unique report card template for each individual grade and attach it to the appropriate grade level.
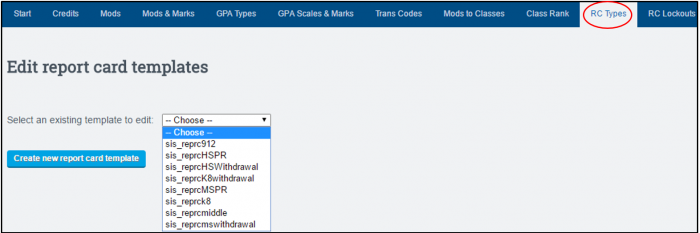
B. HOW DO I CREATE A REPORT CARD, PROGRESS REPORT, WITHDRAWAL TEMPLATE (RC Type)?
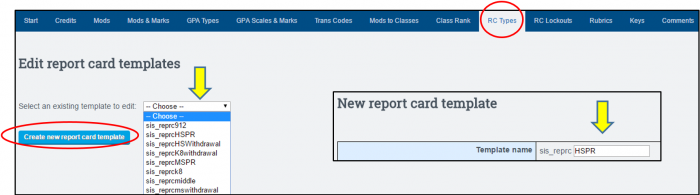
- Click on the “RC Types” tab
- Choose “Create new report card template” to create new RC Type OR to edit an existing template, by selecting the name of template from the drop down box.
- If you are creating separate templates for Report Card, Progress Report, and Withdrawal Report, make sure to clearly label the templates. Example: High School Progress Report template should be clearly labeled with HSPR so the RC Type name will be “sis_reprcHSPR”
- Scroll down and select the settings to customize the look of the template
- “Save Template” or “Save Template and Print Preview”
- Once the rubric, rubric key, and comments have been created you will return to the template and attach appropriate items to the template.
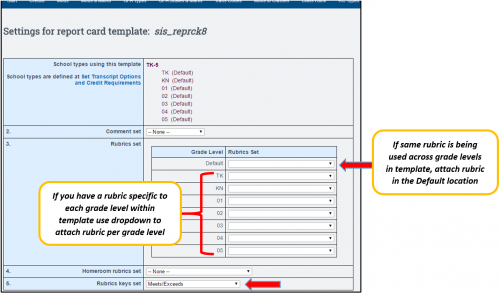
- *NEW* - Ability to create rubric sets per grade level within one report card template (rctype).
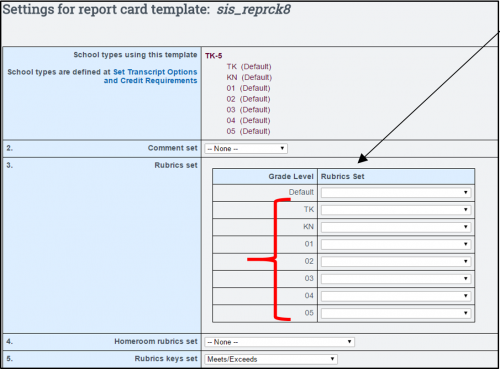
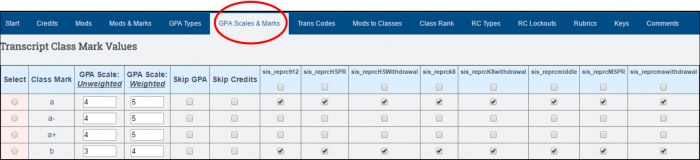
For example, if you have students enrolled in the K-5 School Type, you would create one K-5 Report Card Template, and within that template you can attach a rubric set that is unique to each grade level. You no longer have to create multiple school types per grade level to use grade specific rubrics. - IMPORTANT - When you set up a new template make sure to set the acceptable grading marks per template under the GPA Scales & Marks
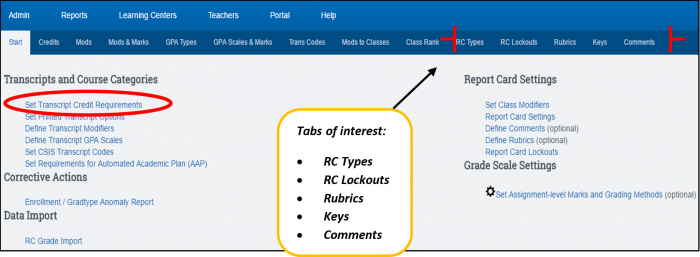
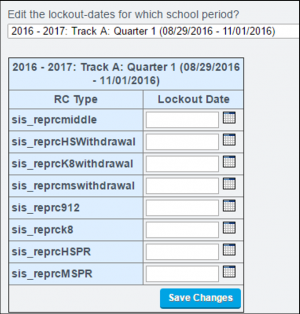
C. WHAT IS THE PURPOSE OF “RC LOCKOUTS”?
You can lock teachers out of the report card area for a specific reporting period as of a certain date so grades cannot be changed once RC's are submitted.
- Choose the Reporting Period and click SHOW. Set the date for each report card type then SAVE CHANGES. Once set, only administration has the ability (set permissions) to change a report card/rubric grade.
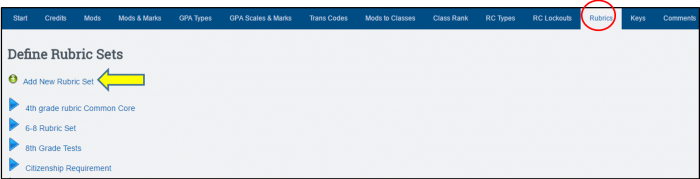
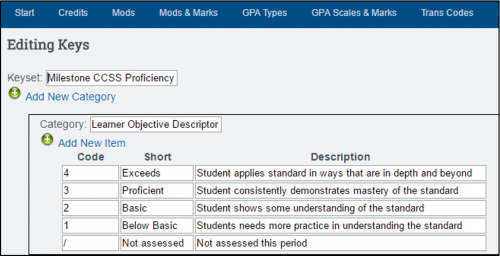
D. CREATING RUBRICS
- Select “Add New Rubric Set“
- Title your Rubric

- Add a Category

- Add an Item by clicking the green icon

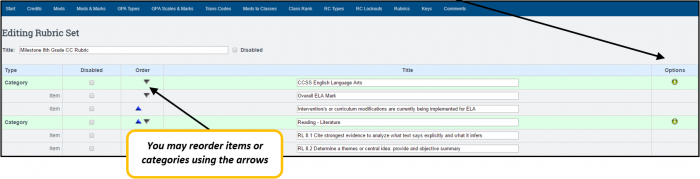
- Keep adding Categories and Items for all your rubric areas. SAVE DATA.
E. CREATING KEYS
Your report card can have multiple keys to explain your grading marks and citizenship marks.
- Click on “Add New Keyset” OR “Edit Existing Key Set”
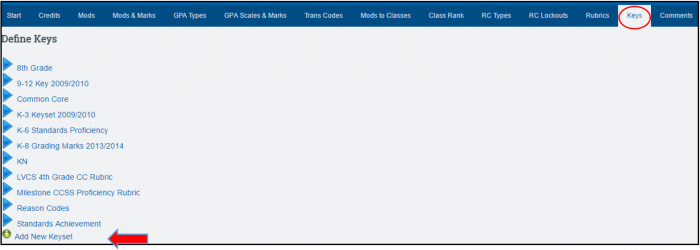
- Add title to your key set
- Click on “Add New Category” to start creating a key set.

- Click “Add New Items” to a Category. Keep clicking the “Add New Items” to get more blanks.

- SAVE the completed Keyset
F. CREATING COMMENTS
- Click the ++Create a New Set ++ and then DEFINE COMMENTS button OR select from the drop down box a list of existing comments to Edit
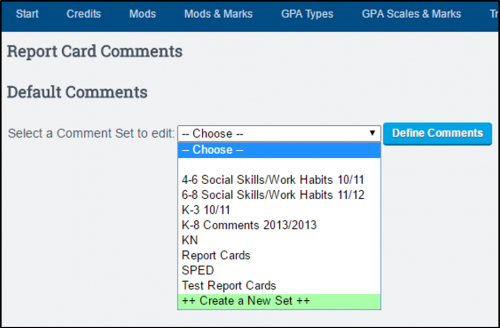
- Title your Comments. Make the title VERY descriptive so that if you want to change the comments next school year, you don't lose the current ones. This is important if you need to come back and print a past report card. You can disable comments but they are never deleted because they may have been used in the past.
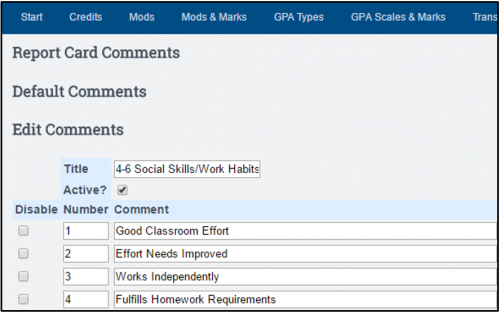
- SAVE CHANGES: To save your list of comments. After this save, you can define another comment set for another report card type
G. ATTACHING RUBRIC, KEY SET, COMMENTS to TEMPLATE
Once you have created your Rubrics and Key Sets you have to attach them to the appropriate template, and then attach template to School Type.
- Click on the “RC Types” tab
- Choose the template that needs to have the Rubric and Key Set attached
- Choose the settings regarding rubrics, key set, and comments:
- 2. No Comment Set has been created
- 3. Rubric Set
- If the same rubric is being used for all grade levels in the template, attach rubric in the Default location
- If you have a rubric specific to each grade level within template (sis_reprck8), use dropdown to attach rubric per grade level
- Example below:
- School Type: TK-5 (includes grades TK-5)
- Using report card template sis_reprck8
- Each grade level is populated that is included in School Type to attach grade specific rubrics to one template
- 4. No Homeroom Rubric Set has been created (for marks specific to a homeroom only)
- 5. Rubric Keys Set – Choose the Key to be used with rubrics
- 6. RC Comments Style – none created but if you create customized comments for report cards, you can choose to have teachers use them by a code or by full text.
- SAVE Report Card Data
- Once rubric(s) are attached to the template (sis_reprck8), the report card template must be attached to specific School Type
- Admin > Transcripts > Transcript/Report Cards
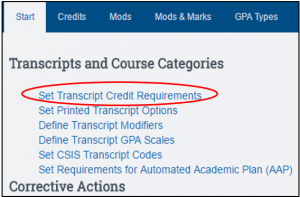
- Click on “Set Transcript Credit Requirements”
- Click on “TK-5” School Type
- Attach report card template: sis_reprck8
- If you have templates for Progress Report or Withdrawal Report you will also attach
- SAVE
H. NARRATIVE REPORT CARD OPTIONS
The Narrative Report Card is now available, which formats printed report card to flow more narratively where comments show below the classes and grades table. Some new options related to the narrative report card are also now available:
- Option #35 - Added “Header Text”: It's like the footer text, but shows just below the header on the first page of a printed report card
- Option #39-1: Checkbox for “Enable Narrative Printed Report Card”
- Formats the printed report card to flow more narratively
- Class comments will now show below the classes and grades table. This is better suited for longer comments.
- Student and teacher names also appear as full first name followed by last name.
- Most RC Type options still apply to the narrative printed report card. If rubrics are enabled, rubrics remain the same and will still show in a table.
- #39-2: Checkbox for “Use a table for class comments”: This will be more compact and save significant space, but may appear less narrative
- #40: Use Minimalist Tables: On the printed report card for tables: Removes background color, most borders, and justifies text to the left.
- #41: Use Compact Header: Addresses are not supported inside compact header, but you can still use #37 Tri-Fold Format