Setting School Calendars
Set/Define School Tracks
Note: If you are only using one calendar for your entire school, you do no have to change anything in this section.
If you want to add a new track:
- Step 1. Go to Admin>Settings>School Calendars
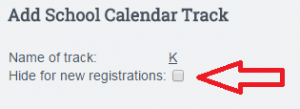
- Step 2. Click Add New Track
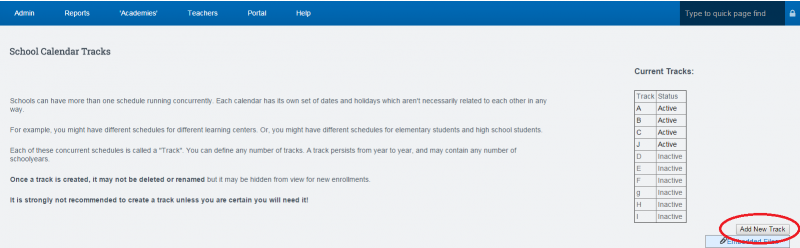
If you want to hide the new track from new registrations, click the box.
- Step 3. Click save changes.
Set School Calendar for a School Year
- Step 1. Click on the Calendar days tab at the top (gray tab).
-Choose the new school year and correct track you wish to add calendar dates for then click Set Year Details button.

- Step 2. Enter the dates for the first and last day of school
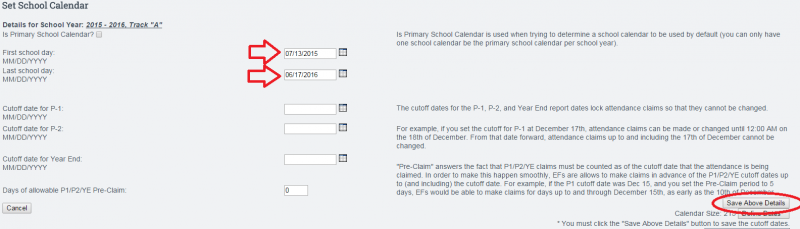
-Entering P1, P2, or YE dates are not necessary at this time and should not be set
-Click Save Above Details
- Step 3. Click “Define Dates”
-You will now add a check to every box to turn the box blue
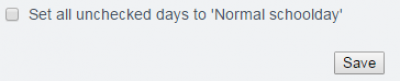
-Or you can go to the bottom of the page and click the “Set all unchecked days to Normal Schoolday” check box. This will auto-fill all days to normal school days
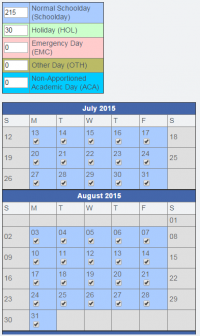
- Click in the blue box once for holidays such as Labor Day so it shows green. If you have days that are set as in-service days that you count in your calendar, click the box until it shows brown. If you end up having Emergency Days, you can come back and click the date box until it shows in red to mark the day as an emergency day in the calendar.
- Step 4. At the bottom of the page click Set this calendar to Active
Note: You will get an error message if you have less than 175 days in your calendar
- Step 5. Click Save
Set Schoolwide Learning Periods
- Step 1. Click on the Update Learning Periods button.
-In the drop down, select the school year and track you want to set Learning Periods for and click next.
-You will see boxes to start entering your beginning and ending dates for each Learning Period.
-As you enter the dates, they will change to another color on the calendar to the right.
Note: If you skip dates, you will see a red alert above the Save above Learning Periods button. In addition, you will not be able to save your LPs if you are missing a school day

- Step 2. Enter dates by clicking on the calendar icon or by entering in the following format: mm/dd/yyyy (e.g. 09/04/2017)
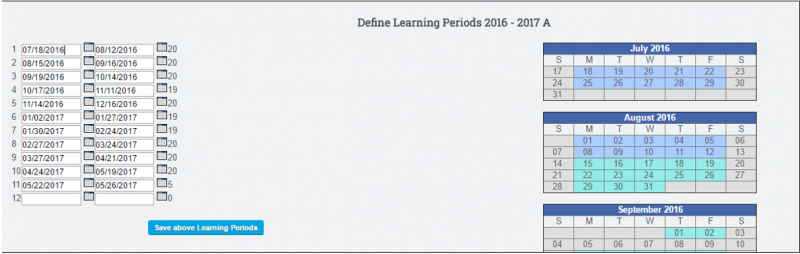
- Step 3. When all dates have been entered, click on the Save Above Learning Periods button to save.
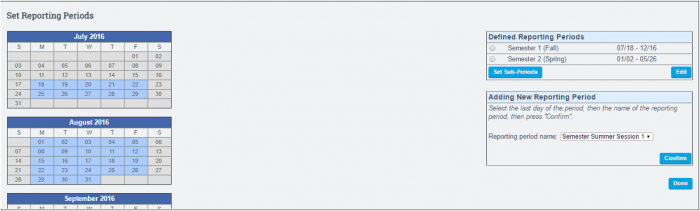
Set Reporting Periods
- Step 1. Click Reporting Periods at the top of the page.
- Step 2. Choose the school year and track you want to work in and click Edit.
- Step 3. Click on the first and last day of the first reporting period (first and last day of semester,trimester,et al).
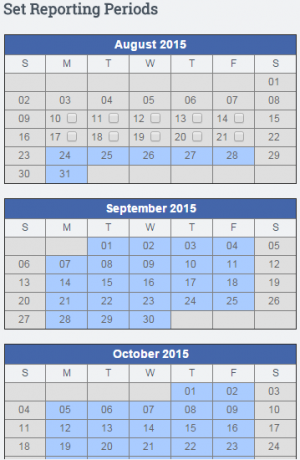
- On the right side-lower box you will see “Adding a New Reporting Period”. When you are creating Learning Center Report Cards that will go into ReportWriter, the program needs to know the time frame of your reporting periods.
Most common values are SEMESTER, TRIMESTER, SESSION, or QUARTER. - Click Confirm to save your choice. You will see what you saved in the above box.
- Continue this process to set all reporting periods.
- IMPORTANT: If you want to use progress reports in the system, you must set sub periods for progress reports. Choose the main period and then click “Set Sub Periods”.
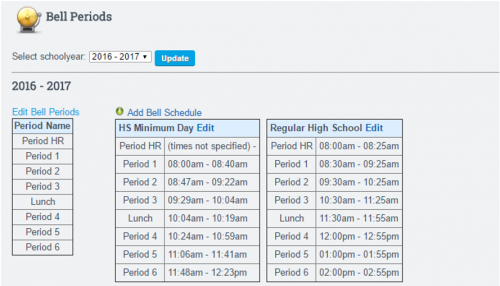
Set Bell Periods (Optional)
- Click on Bell Periods tab at the top of the page
- Choose the school year you want to create bell periods for and then click Update.
- Click the Edit Bell Periods link to name your bell periods
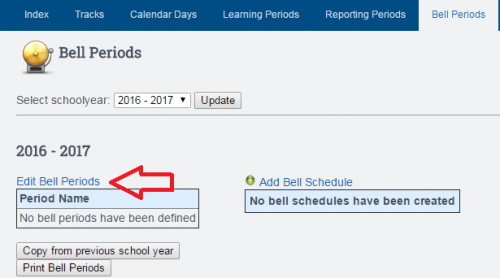
- Click the Add Bell Schedule link at the top of the page. This will create an empty text field. Enter the name of the bell period. Continue this process until all desired bell periods have been named.
Click the save button.= - Click Add Bell Schedule link to enter the times for each bell period.Enter the schedule name at the top of the page. Then add in the times for each bell period. You can move the periods around in the schedule by clicking on the green arrows. When the schedule is complete, click the Save button.