Barcode / Scanned Attendance - Administration
Overview:
- School Pathways scanned attendance is 100% compatible with all biometric scanning solutions (fingerprint and retina), as well as onsite badge printing solutions.
- Scanning can be done online or offline in case of power and internet outages. Simply synch your ReportWriter software when you are back online to upload the informational attendance.
- Informational attendance can currently be tracked for students and staff in many situations such as campus attendance, class attendance, and field trip attendance. School Pathways is currently developing parent attendance and assets management.
- SB740 Funding: Most charter schools are required to spend 80% of their funding on students, and can only spend 20% on administrative overhead. Most of the time, these schools have to count building costs as administrative overhead. Tracking time that students spend at the campus receiving instruction allows schools to deduct building costs as education delivery costs (in the 80% column), rather than as administrative costs. Coordinate with your auditors for the specifics of how to do this. Our SB740 report provides the raw data for this process.
- Attendance taken with this software can only be used for advisory purposes, as the California Department of Education requires ADA attendance to be taken by the teacher.
- To view a list of suggested scanners and badge printers, go to Help > Recommendations > Hardware in the SIS menu.
Setup Process
- Barcode attendance must be setup for your school. Please contact a School Pathways representative to get more information and pricing.
- FOR OFFLINE ATTENDANCE TRACKING: Download ReportWriter software to your computer(s). ReportWriter will need to be installed on each computer which will be receiving the scans.
- Set your number prefix: Administration > Settings » Policies. Click on Barcode Attendance. Set your prefix for both Student ID and Staff ID (this will show at the beginning of each student's barcode badge number):

- Make sure the students are enrolled in at least one classroom based class.

OPTIONAL: Setting up a background for your badges:
If you would like a background for your badges, go to Administration > Attendance » Badges »> Badge Settings:

- Choose your file, then upload the PNG image.

- Click on “Edit Layout”:
- Adjust the position and text size as needed. You can click on Update to see your changes. When done, click on “Save”:

Printing Badges:
If you are going to use badges, you can print them by going to Administration > Attendance > Badges:

- Choose the students you wish to print (or have printed by a badge printing service). You can limit your search by Education Program, Primary Class Offering, Teacher of Record, Gradelevel, dates enrolled, and/or search by individual student.
You also need to choose your badge style. If you are using backgrounds, make sure the option with “Badge Backgrounds” is chosen!
When finished, choose “Print Selected”.


- These will appear in a .pdf format - you can either print on your own paper, send to a badge printer, or outsource to a badge-printing company.
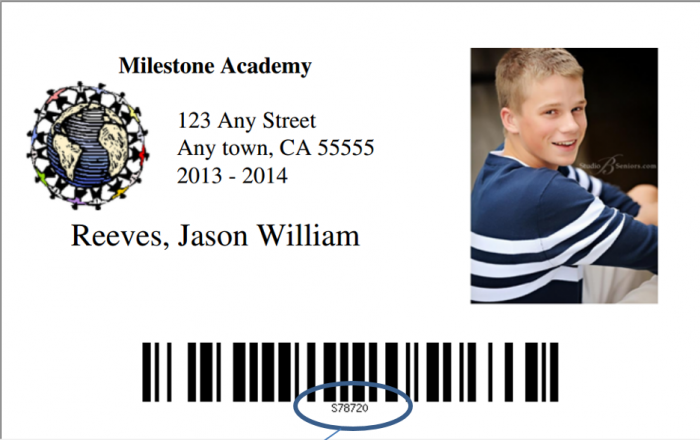
- Note that the number at the bottom of the barcode follows the following format: the letter is the prefix you set in the policies area. This alerts the staff whether they are a student or a staff member. The numbers are the student's local number.
Campus Attendance
(Note: If you are taking campus attendance, you will need a scanner setup at each entrance and exit to the building.)
Barcode attendance can be taken either online or through ReportWriter (Offline Attendance).
Online Attendance through the SIS:
- Go to Admin > Attendance » Online Scanner:

- Enter in the Location ID for the campus:

You will need to enter in the Location ID (Loc ID) of the campus . To find this in the SIS, go to the list of classes for the Learning Center or the Instructor's class list:

- Click into the ID box so it turns green. This means it is ready for the scan. Scan or manually enter in the student's barcode number:
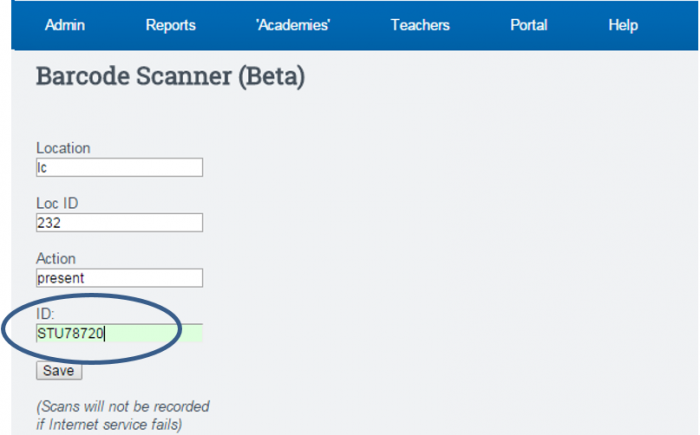
The scanner should submit the number automatically. If you are manually entering the number, hit the “Enter” button.

This initial scan confirms the student is on campus. The second scan will show the student as off campus.
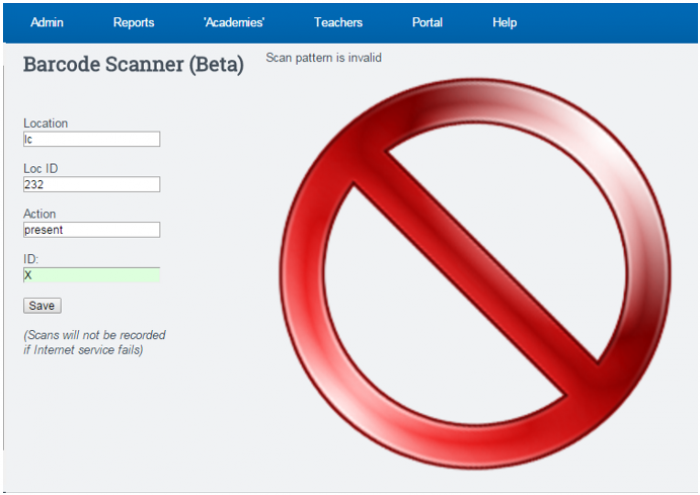
If a “bad scan” is completed (such as an unreadable barcode or an invalid student number), the system will alert with a loud noise and a big 0 with a line through it:
Offline Attendance through ReportWriter:
Log into ReportWriter to begin a claim for any student. You will need to complete two initial synchs - one to download the software, the second to download all student pictures and information.

Go to Tools > Barcode Attendance:


You will need to enter in the Location ID (Loc ID) of the campus . To find this in the SIS, go to the list of classes for the Learning Center or the Instructor's class list:

Click into the ID box so it turns green. This means it is ready for the scan. Scan or manually enter in the student's barcode number:

The scanner should submit the number automatically. If you are manually entering the number, hit the “Enter” button.

The student's picture will show, allowing you to confirm this is indeed the student. If you have speakers on your computer, it will also speak the student's name.
The number underneath the ID box shows how many students are waiting to upload to the SIS. The system automatically uploads this information approximately every 60 seconds if you are online. You may also manually upload this information by clicking on the “Upload” button.
This initial scan confirms the student is on campus. The second scan will show the student as off campus.
If a “bad scan” is completed (such as an unreadable barcode or an invalid student number), the system will alert with a loud noise and a big 0 with a line through it:

Class Attendance
There are two ways to set class attendance:
- Find the class ID and input manually into the box (from the Instructor's Class List, click on the class name).
- Go to the class Attendance and click the “Set” button:

Scan the student or manually enter the student's number:

As with the campus attendance, the first scan shows the student in the class, and the second scan shows the student out of class.
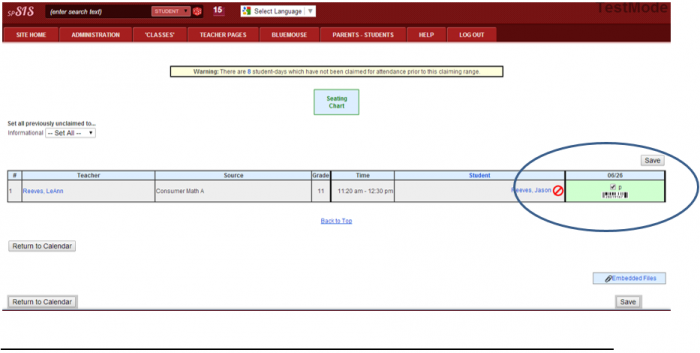
Once a student has been scanned into the class, a barcode symbol will show in the teacher's attendance for the day. This will help the teacher decide whether to claim the student with ADA Present Attendance. There is also an icon that will show the student as either on campus (green circle) or off campus (red circle with line through it).
Available Reports
Student's Dashboard

Directly above the student's picture, there will be a scanned attendance icon. Green Arrow means on campus, Red Arrow means off campus. Click on the icon for more detailed information:

Campus Report
Go to Reports > Barcode > Campus Report:


This report shows all students on the campus and in classes for the day and site chosen. Please refer to the legend for details on all the icons. These icons are each unique in design and can be used with the colorblind disability.
SB740 Time Tracking
Go to Reports > Barcode » SB740 Time Tracking:

SB740 Funding: Most charter schools are required to spend 80% of their funding on students, and can only spend 20% on administrative overhead. Most of the time, these schools have to count building costs as administrative overhead. Tracking time that students spend at the campus receiving instruction allows schools to deduct building costs as education delivery costs (in the 80% column), rather than as administrative costs. Coordinate with your auditors for the specifics of how to do this. Our SB740 report provides the raw data for this process.

This report shows the actual amount of time spent on campus for each student. Click on the Magnifying Glass icon for a more detailed view of the time tracked:

Scan Activity
Reports > Barcode > Scan Activity:

This report will show raw results of all scan activity during the time period selected.

Attendance Report
Go to Reports > Barcode > Attendance Report.
This report shows an overview of the scanned attendance claims.

Choose your search criteria, then “Generate Report”:
