Attendance Codes and Claim Override
When students are marked absent or tardy, schools enter a code for the type of absence. This manual explains how to set up the codes your school will use and the two ways you can mark the codes for the absent days.
I. Setting Codes your School Will Use
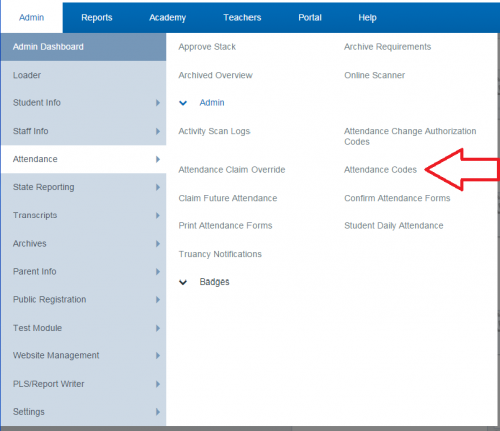
- Step 1. In the SIS go to Admin>Attendance>Admin>Attendance Codes
- Step 2. To enter new codes, click Add New under the desired program type.
Some codes are preset.
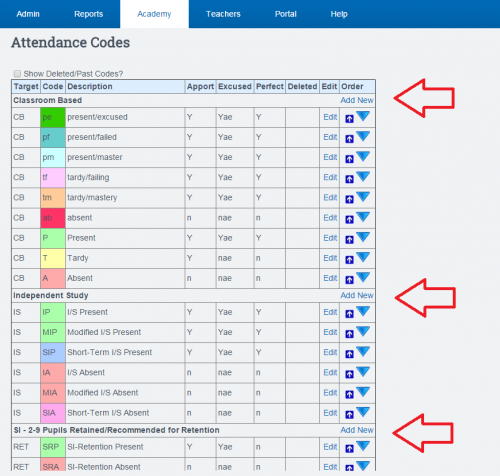

- Step 3. Fill in the following fields:
-Code: What do you want the code to be.
-Color: Choose a color that will be distinct and has not been used yet.
-Brief Description: Enter a brief description so other people will know what the code is.
-Attendance Target: What type of attendance is this code for.
-Apportioned: Will this code allow apportionment?
-Excused: Will this code mark the day as excused?
-Perfect: Will this code be considered analogous to 'Present' and be eligible to be considered in the “Perfect Attendance” report.
-Show in Admin Override: Will the code be available on the Administration Claim Override Report.
- Step 4. Click the Save Changes button.
Now the code will be shown as an option on the attendance Codes page.
I-A: Enabling New Codes for Instructor Use
Following the steps above, your new attendance codes are available in the system for administrators to use in Attendance Claim Override, but are not available for instructors to use on their initial attendance claims.
If you'd like instructors to be able to use the codes, complete the following:
- Go to Admin > Settings > Program Options
- Click on the Edit link to the far right of the program name matching the Attendance Target you chose for the new code(s) (See Step 3 above)
- Find the new codes in the list in the Attendance Codes section near the center of the next page.
- To make the code available for instructors, check the box in the Code column. To make it the default code when claiming attendance, check the box in the Default? column.
II. Overriding Attendance Claims
- Step 1. Go to Admin>Attendance>Admin>Attendance Claim Override

- Step 2. Fill in the following fields:
- The Academy
-School Year
-School Track
-Learning Period
-Date Range
-Academy Instructor (if desired)
-Teacher of Record (if desired)
-Attendance Target (if desired)
-Whether or not to hide “Present” claims, “Informational” claims, or Deleted claims
-Or just search for a specific student by name
- Step 3. Click Update
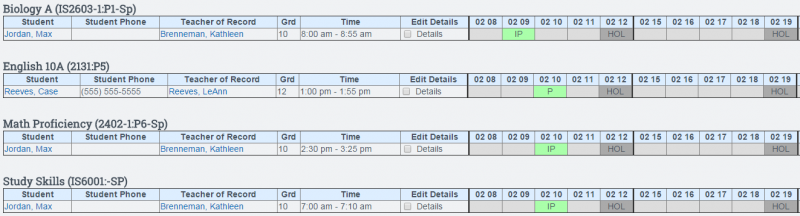
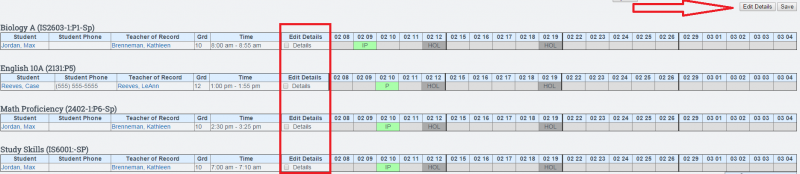
You will get a list of all students who had attendance claimed for the specifications you set
Green Squares indicate that the student was present, red squares indicate that the student was absent, and yellow squares indicate that the student was tardy
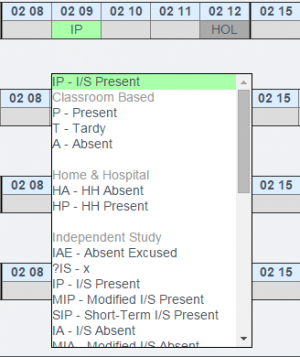
If you click on any of the claims, a pop-up will appear and you will be able to choose the code that you wish to override the original claim with
- Step 4. Click save to save any changes you have made
You can mass change claims by selecting the “Details” check box and clicking the “Edit Details” buttons.
From this page you can change multiple attendance claims at once by changing fields in the top “Set All” row. The claims can also be mass-deleted by selecting the check box on the top left hand side of the page.
Then select the terms you wish to change and it will populate the fields as requested.Click Save Changes button when you are finished.

By clicking on this Hist link, you can view the History of an attendance claim with details such as the date/time that claim was made and the staff member who claimed the attendance.

— Last Updated by Max Williams on 2016/03/07 19:49