Report Cards
I. View/Create a Report Card for One Student
- Step 1. Go to your roster
- Step 2. Choose the reporting period you want to work in.
- Step 3. Open the folder of the student you want to work with.
- Step 4. Click Reports
- Step 5. Click Report Card.
Note: If one of the classes the student is enrolled in is not showing on the report card, you must check the Edit class page for that class on the roster and unclick the Hide From Report Card option.
- Step 6. If your student is in High School, they will probably be earning credit for their courses. Presets will show in the credits attempted column. If you are using the grade book, the computed grades will show in the Calc Grade Column. You can override credits attempted or grades calculated by typing in the appropriate override box.
- Step 7. Decide if the class should be hidden from the printed report card or not.
- Step 8. Add any comments you want to the Report card.
- Step 9. When finished with the report card, click the Finalize/unfinalize check box.
Note: This allows the report card to be imported into transcripts by the office. It also allows data to be imported to CALPADS reporting. If a change needs to be made to a finalized report card, the finalization must be unchecked, data changed, and resaved.
- Step 10. Click Save.
Note: You can only print report cards that have been finalized.
II. Multiple Student Report Card Access in the PLS
Teachers > PLS/RW Oversight > PLS Review Report Cards
Note: If you need to create a Progress Report or Withdrawal Progress Report, click on the appropriate link instead.
Choose your settings (all blue arrows) then click Update Student List
Choose the student(s) you would like to work with by clicking the box to the left of their name (Select All button displayed at the bottom of the list) then click on Review Report Cards or Review Rubrics.

You will now be able to work on all selected student report cards at the same time. Save Often!!
Note: Finalize and save each report card or in MASS at the bottom of the page. Report Cards MUST be finalized in order to Import to Transcripts and report to CalPads!!
Field Definitions
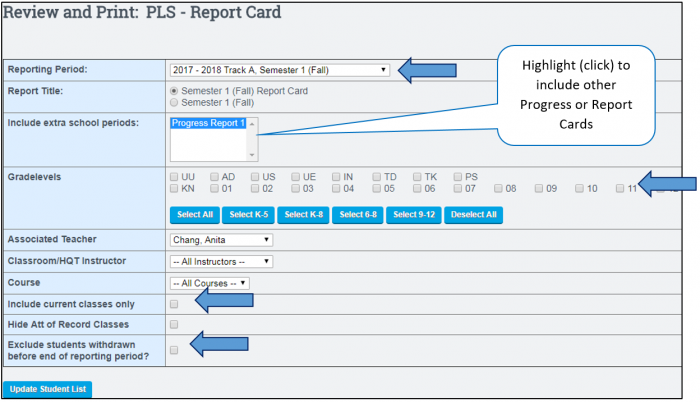
- Reporting Period: Select the reporting period you wish to grade.
- Report Title: If you would like to change the title of the report card, click to select from additional radio button options
- Include Extra School Periods: Click to highlight one or more additional school periods. For example, if your school completed a Qtr 1 Progress report and you wish to show historical progress you may click to add Qtr 1 Progress Report grades on your Semester 1 Fall Report Card.
- Gradelevels: Click to add all grade levels needed.
- Associated Teacher: This will generate the Homeroom or Primary Teacher’s Roster of students.
- Classroom/HQT Instructor & Course: This will generate a Highly Qualified (HQT) or Subject Matter Specialist’s Roster of students. For example, if you are listed as HQT of Algebra 1B you can select Algebra 1B from the course drop down and generate your roster of Algebra 1B students for grading. (Note: the Associated Teacher field should be left blank for this process)
- Include Current Classes Only: If checked, only current classes of the reporting period date range you are grading will show. Any classes that have an end date prior to your reporting period date range will not be shown.
- Hide Att of Record Classes: Click to hide any Attendance Classes students are enrolled in for the reporting date range you are grading.
- Exclude Students Withdrawn Before the End of the Reporting Period?: If checked, students that do not have a current enrollment record with your school for the reporting date range you are grading will not be shown.
Additional Functionality of the Page
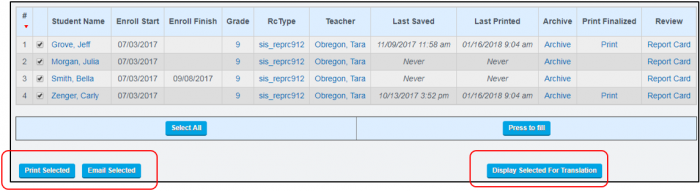
- Print Selected: Once students have been selected, if clicked this will generate a PDF Report Card for all students who have finalized report cards.
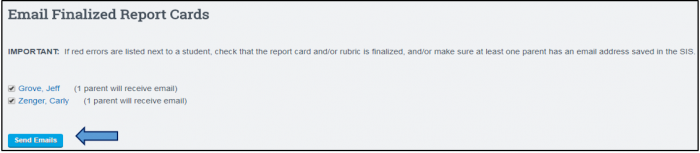
- Email Selected: Once students have been selected, if clicked this button will generate an emailed PDF report card version for any students that have a finalized report card. The following page will indicate all students with a finalized report card and option to uncheck or Send Emails to all students listed.
- Display for Translation: Once students have been selected, if clicked this button will display a print preview of all reports cards whether or not the report card has been saved and finalized.
Generating a GPA Report
- Update your student list with appropriate grade levels and select any or all students by clicking the checkbox to the left of their name.
- Click on Select GPA Report to quickly check limited default GPA options then click on Export Selected Students to generate a csv spreadsheet of all students.
Note: You may add additional columns by clicking next to the appropriate field or add ALL columns by clicking on Select All prior to clicking the export selected student button.
\\
III. Two Report Cards for One Student in the Same Semester
Student enrolls in the school at the beginning of the school year, stays for 2 LPs, and dis-enrolls at the end of LP 2. They completed work and earned some credit.
Assignments were made and graded for LP
For the report card, grades are coming over from the grade book.
The teacher needs to work on this report card and finalize it.
The office will import the report card to the transcript and the student is ready to move on.
Then the student decides that your program is the best for them and they re-enroll in your school in the middle of LP 4.
- Step 1. Open the student's report card. It should already be finalized, but because you will be adding to it, you will unfinalize it and save.
- Step 2. Return to your roster.
- Step 3. Open the student's folder.
- Step 4. You will keep the classes the student was in previously. If you do not want them on the report card, you will edit each class and check the Hide from Report Card. (If you want the class removed from the MA as well, uncheck the box that says Show on Master Agreements.)
- Step 5. Edit each course you will be assigning from to reflect the correct number of units the student will attempt, the correct teacher (that would be you, do not enter an end date for yourself), and the end of the previous teacher’s association with the course by entering an end date for them.
- Step 6. Add any new classes you want the student to take. Notice the start date will automatically be set to the student’s new enrollment date.
- Step 7. Create the student’s new Master Agreement.
- Step 8.Start assigning work for the LP of the new enrollment date
- Step 9. At the end of the semester, unfinalize the report card, enter grades, finalize and save.