PLS: Copy Classes to Next Reporting Period
Part I: The PLS Roster
To begin the Copy process, go to the PLS Student Roster (Teachers > PLS Student Roster), then follow the steps below:
- In the Search Box at the top of the page, click the blue arrow labeled Set Copy MA Mode
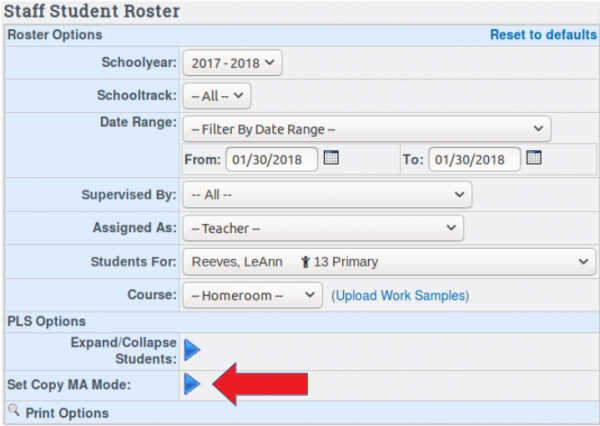
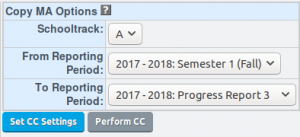
- A new set of fields labeled Copy MA Options will appear to the right of the Search Box with the track and the reporting periods you're copying from and to. Make sure the reporting periods are correct and then click the Set CC Settings button. Do not click the Perform CC button yet!
- Click on the question mark icon next to Copy MA Options to display step-by-step directions on the copy process
- Scroll down to the list of students and open any student folder you want to copy by clicking on the blue arrow to the left of each student's name. If you are copying all or most of your students, you can click the Expand/Collapse Students arrow near the bottom of the Search box at the top of the page to open all student files, and then close any records you do not wish to copy.
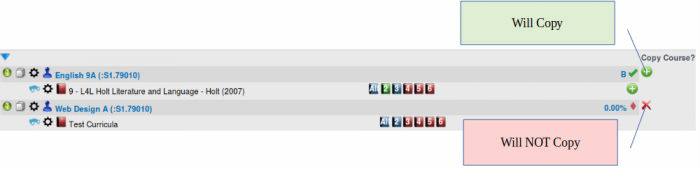
- As you open student records after clicking on Set CC Settings, you will notice a new column labeled Copy Course? along with green plus icons (
 ) to the right of each PLS class name and each individual curricula. A green plus icon to the right of a course or curriculum means that it will be copied to the selected reporting period, while a red X icon indicates it will not be copied. Click on the green plus to toggle it to a red X, and click it again to toggle it back.
 - Only PLS classes can be copied. If the student is enrolled in CMS classes, they must be enrolled in a class that takes place during the second semester for it to show on the PLS Student Roster. If a student has a PLS class which is merged with a CMS class, it will need to be merged again after the copy in the next reporting period.
- When you have all of your students and classes set to copy how you would like, click the Perform CC button
Part II: Pre-Copy Settings and Adjustments
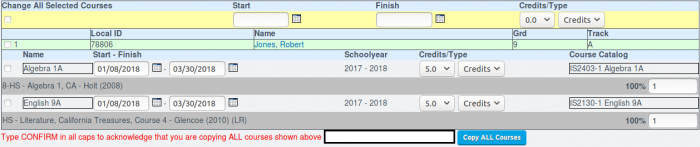
After you have clicked on Perform CC, you will be brought to a page that allows you to make changes to the new classes in the selected Reporting Period, such as changing their Credit/Week value or their class name. Below are some examples of changes that may be needed when copying a class to the next reporting period:
- Credits/Weeks: If the class is worth less or more credits/weeks than the last reporting period.
- Class Name: If in the first reporting period the “A” version of the course was offered, and the “B” version is being offered in the next reporting period. Note that the Class Name may be restricted by the school's Course Catalog, and may need to be changed along with the Course the class is attached to. See next section for details.
Some settings can be changed for all courses by clicking the Change All Selected Courses box in the yellow row at the top left of the course list. Once this is checked, anything changed in the yellow row will change for all courses on the page.
Changing a Class's Course

If a class name needs to be changed, it may be required that the course it is attached to needs to be changed as well. To do this, click on the Name field or the Course Catalog field for the class that needs to be changed and new fields will appear that allow you to choose a new course and name for the class. Once you've chosen a new course, click the Set button to save the change.
Once you've made all necessary changes to the classes, type “CONFIRM” into the box at the bottom of the page and click the Copy ALL Courses button, and you're done! You should now see your new courses on the PLS Roster after changing the Reporting Period/Date Range field in the Search Box.